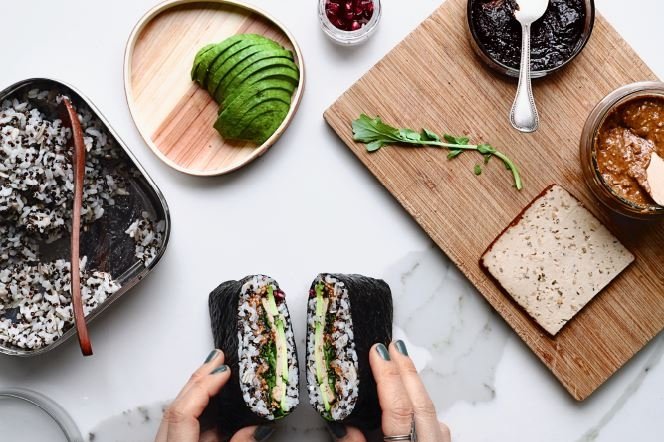
The onigirazu or “sushi sandwich” is a contemporary sibling to onigiri and a brilliant invention: rice plus whatever fillings you like folded into a whole nori sheet like a package. You don’t need to be a pro to get it right straight away, and you can get enough filling in there for a substantial lunch (I make 1 to 2 onigirazu per person).
Use white Japanese, brown short-grain, or any mixed-grain rice (like this lilac rice) to make onigirazu. If you use the rice warm, its steam “glues” the nori wrap together. If you use room-temperature rice, use wet hands to wrap (to make it stick that way). Onigirazu is best made in the morning with fresh rice and eaten the same day, but you can make it in the evening and refrigerate it overnight too (you’ll just have drier rice). Once you’ve got the hang of packaging it up (it doesn’t take long), onigirazu can easily become a lunch staple.
Go wild with the fillings! You’ll soon work out how much your onigirazu can hold before it’s impossible to close. Use anything as long as it’s not too wet or oily. Just make sure you always finish with a top layer of rice so that no moist filling touches (and dissolves) the seaweed.
To make:
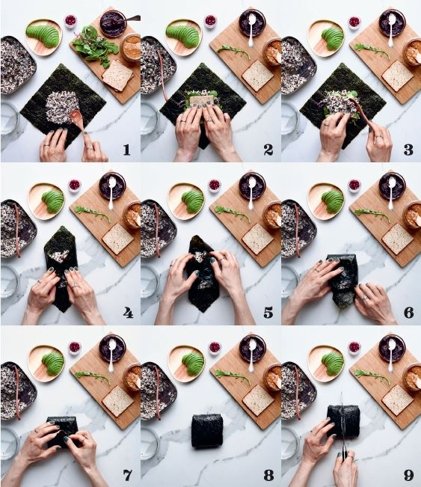
Place nori sheet in front of you on clean work surface, with one corner pointing toward you. Use 5 1/2 to 7 oz rice per onigirazu. Using half this volume (3 to 4 heaped Tbsp), make square layer of rice in middle of nori, max 3/4 inch thick and about 3 1/4 inches square (image 1). Leave a little margin around the edge so you have enough nori to fold later. You can wet your hands a little to help shape the rice.
Add fillings as evenly as possible, and give everything a little squeeze from the top to compact (image 2). Finish with second volume of rice, making a layer the same thickness as the first (image 3). Again, wet your hands to help shape the rice here.
To wrap:
Imagine wrapping a birthday gift. Pull left and right nori corners together and overlap them with filling safe inside (image 4). If you’re using warm rice, it should be enough to glue the nori corners together, but if not, wet your hands. Do the same with top and bottom corners (image 5), tucking folded corners in to make sure that no rice peeks out (images 6 and 7). Flip onigirazu over and let it rest a few minutes on work surface for warm rice/water to glue nori together (image 8).
To pack:
Pack onigirazu just as it is and eat it like a sandwich, or slice in half with sharp, wet knife to show off the pretty insides (image 9). You can also wrap onigirazu and skip the bento box entirely. I use a wax wrap or foil lined with parchment paper to reduce the use of plastic. Don’t let damp foods touch the onigirazu if you pack it in a box, as they may dissolve the nori
Some like it hot
To heat rice microwave free, use an ordinary steamer basket lined with a little parchment paper to stop the rice from falling through. Steam for 5 minutes or until piping hot.


